What is an SLA?
Service Level Agreement is a quantitative target for your support agents to respond/resolve tickets based on the priority of the tickets. It is to make your customer know the time you or your agents will be taking to respond/resolve to the tickets raised by them. It is like setting a standard of performance for your support team.
How to create a new SLA Policy?
To create a new SLA Policy, open Settings > Ticket > SLA Policy and click New SLA Policy.

- Set a name for the SLA Policy
- Choose the condition(s) which defines the type of tickets for which you want to set SLA Policy.


These are the conditions that be used to trigger a particular SLA policy.
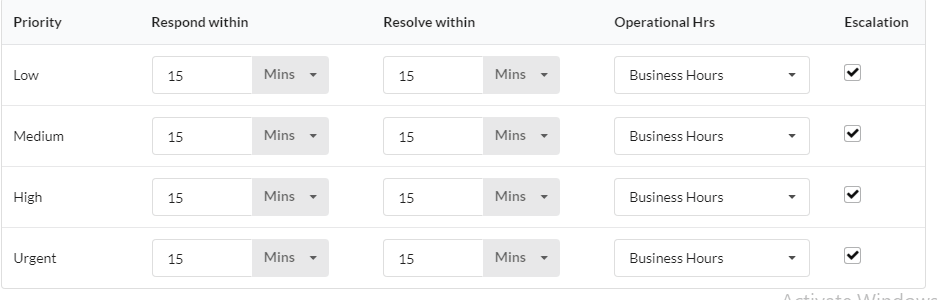
- Now, you have to define the SLA targets for each ticket priority levels. You can set the response and resolve time in minutes/hours/days/months.
- Provide your organization holidays under Settings > Holidays. So that SLA policy will be skipped during those holidays.
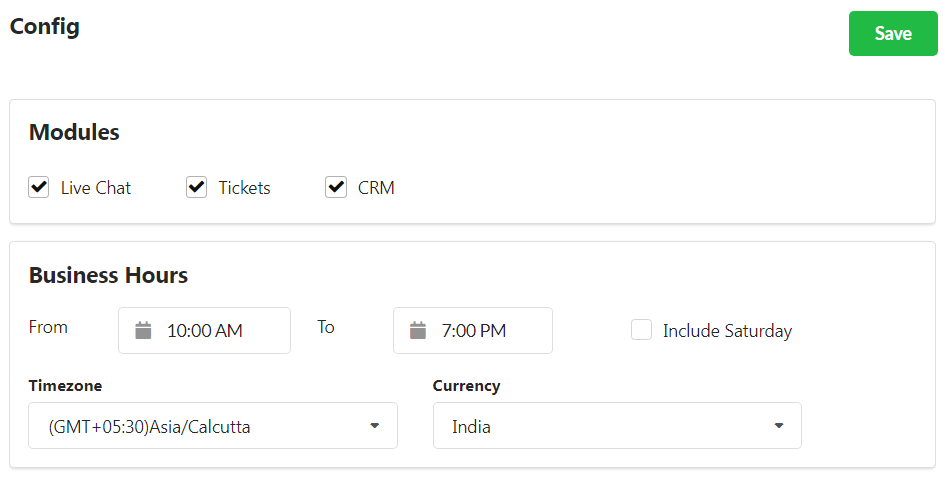
- Set your Operational hours for SLA policies so that the SLA timer stops when your team is away from the desk.
To set Operational Hours (or) Business Hours, go to Settings > General > Config and add your business hours timing and time zone.
- Configure Escalation – Enable the escalation checkbox and enter the email ID(s) to which the violated policies (tickets) must be forwarded.
- Click “Save“
Edit Default SLA Policy
The default SLA Policy of Output Desk applies to all tickets. You can either use the default SLA Policy or edit the Default SLA and apply it to your tickets (or) set new SLA Policies.
- Login to Output Desk.
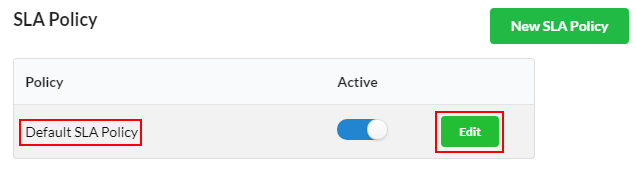
- Go to Settings > Ticket > SLA Policy.
- Click the “Edit” option associated near the “Default SLA Policy“
- Make the necessary changes according to your requirements and click “Save“
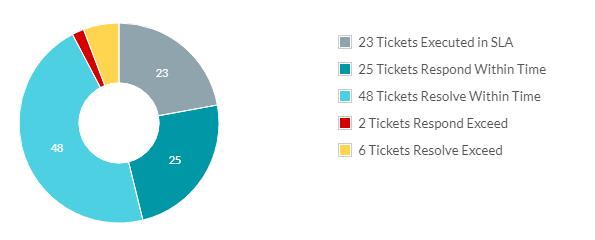
SLA Reporting
Along with the improvement of standard of customer support performance, it is necessary to track (or) measure your level of improvement with SLA reports. Automatically, SLA reports gets generated once you set and apply SLA policies for your tickets.
And, view the SLA report under Reports section.